Photo Negative Scanning

Negative film in a black background

PHOTO NEGATIVE SCANNING

Digitise your negatives & transparencies

PHOTO & FILM NEGATIVE SCANNING

High quality photo negative scanning service

Negative film strip

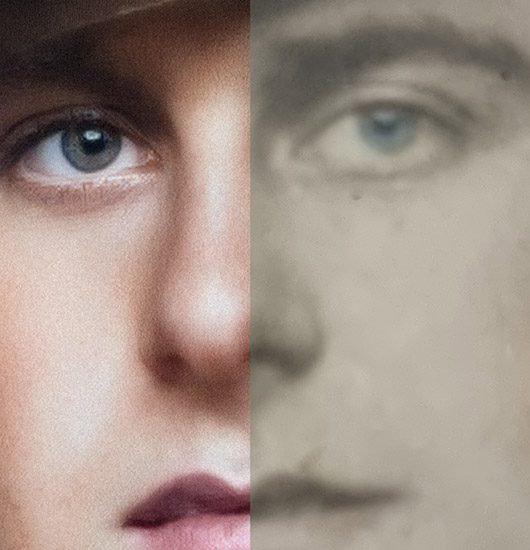
Have you ever stumbled upon old negatives hidden away in a shoebox, longing to unlock the stories they hold? With our expertise, those cherished memories can be transformed into timeless digital treasures. Step into the world of nostalgia and relive memories with our cutting-edge film and transparencies digitisation services

THE BENEFIT OF SCANNING PHOTO NEGATIVES

The biggest benefit of photo negative or negative film scanning is that there is not paper texture to edit, when scanning an old photo it is likely that you encounter different textures such as honeycomb or rugged surfaces.

During several periods in history textured papers were quite popular, however today restorers can suffer the consequences of this past trend specially with the “satin photo paper”.

When a textured photo is scanned, a series of repetitive light and shadow patterns are inherited, these can be reduced by the scanner native algorithm or by simply blending four scans of the same photo with a 90 degree rotation and blending together, however paper texture removal from a photo is always a big challenge.

Therefore texture might require to be digitally removed, softened or replicated, a process that is usually challenging, time consuming, and possibly destructive to the image. 

Good news are: When scanning negatives and slides paper texture isn’t a problem anymore.

Advanced techniques, algorithms for image processing and photoshop plugins are available to supress periodic patterns, remove or minimise the paper texture of an old photo, by separating frequencies with methods such as FFT (fast fourier transform) however the deterioration of an old photo could complicate the process as it will confuse the algorithm in some instances. 

Visit our photography scanning tips page to know more about image digitising or check our transparencies scanner recommendation if you want to digitise these at home


Old photo paper texture pattern
Repetitive patterns from textured photographic paper can be avoided when scanning photo negatives

COMMON PHOTO NEGATIVES ISSUES

Photo Negatives are made out of a transparent material, such as plastic or glass, therefore scratches are quite often the issue to address followed by mould and temperature deformation.  

Photo negatives provide lot of flexibility when digitalising your photos, this means that it is preferable to work from negatives rather than the actual photo.

Bad news are, photo negatives are often more likely to suffer physical damage if not preserved in a good environment, meaning that sometimes the original photos could be a much better input source.

So it is worthy to have a good look around before commencing the restoration process and decide which source provides the best input for the photo restorer and for the project itself.

In some instances, scanning both prints and negatives together to build up photo-hybrids can help to achieving good results, as both might provide information the other source is missing.

Detail of a photo negative with scratches on its surface
Cleaning negative film might result in scratches, thus it's crucial to minimise friction between dust particles and the transparencies surface.

How to Scan Photo Negatives?

Scanning negatives the right way

1. Prepare your negatives for scanning: 

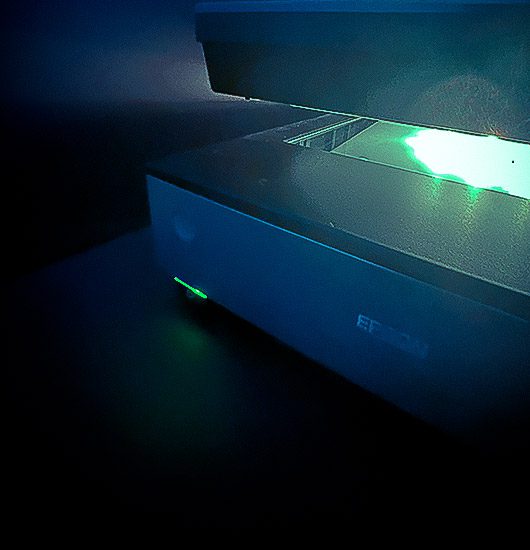
Before a digital photo restoration can be performed, the original photo negative needs to be scanned properly. This is a crucial step and critical to achieve good results, since it ultimately determines the quality of your restored photo.

Regardless, you will need to either send the negatives off for professional drum scanning, or have a film negative capable scanner. And remember at Yesterday’s photo we can help!

However, please be careful not to damage the surface of your negatives as this could deteriorate the film. Instead, be gentle and start by cleaning with a compressed air duster prior to employing any other cleaning method. (However, keep in mind that some users face condensation issues with air dusters.) To cut a long tale short, by using this technique, your scans with reduce the need for digital dust and scratch removal.

Negative film shows signs of deterioration due to scratches and dust
Photo restoration loupe magnifier, item to perform an old photo damage assessment

3. Know your Dpi’s

The greater the amount of Dots per inch (dpi), the more the detail your scanner will be able to capture, the only downside to this rule is the size of the output file, as more pixels per inch mean more Megabytes of information, specially when dealing with uncompressed formats as TIFF. 

A standard of 300 dpi is recommended when printing most photographs, however when we are talking about old photo restoration and specially when enlarging a photograph a higher density of pixels its absolutely necessary, have in mind that there is a limit on how much information is carried out by a negative, slide or print, specially when deteriorated by external factors

Epson-V850 pro flatbed scanner

4. But how to get a good quality scan using your home scanner?

Some home scanners will provided you with amazing features and can do a fair job, 

We usually recommend scanning at 600 to 1600 dpi at least and in colour (regardless if the source photo is in black and white) but it all depends of the purpose of the scan and your tech resources,

To identify the required resolution and what is appropriate for your project, you need to determine output physical size, desirable file size range, proximity to the viewer, printing material, or display resolution. (HD, Full HD, 4k) 

Have in mind that prints always require a higher resolution than a display and that reducing the resolution and size of a photo is much easier than increasing it.

You could be tempted to utilise low-resolution/fast settings while just scanning for social media. Despite the fact that this is practical if you want a photo right away, it is detrimental if you wish to preserve a family genealogy item. Instead, keep in mind that your scan today might be the heirloom of tomorrow.

STILL NEED HELP CONTACT US TODAY TO CHEK ON OUR SCANNING SERVICES

WE SCAN YOUR PHOTO NEgatIVES

Our Postman will
Deliver !

Write us if you have a question or if you want a personalised service or an estimate.

Our team is always ready to help! 

No stamps required!

Photo Restoration Tips – Scanning

old photo faded, blurry images and colour information lost and hardly recognisable faces

WHAT YOU GET OUT OF SCANNING,
DEPENDS HIGHLY ON YOUR INPUT

graphic vintage item

The first step in digital photo restoration is digitising your photos.

 There are a lot of reasons why you should scan all of your old photographs and transparencies, but the main one is that it’s the only method to restore them in a high quality format that will look great when exhibited or printed. 

You have control over the exposure and appearance of the image when you scan it yourself. You can alter the resolution, crop off unwanted sections (or leave them in), change the colours and brightness, and make any other adjustments that make sense for the particular image.

It is important to understand the difference between resolution and pixel dimensions. Resolution refers to the number of pixels in an image, whereas pixel dimensions refers to the physical size of those pixels. For example, a 300dpi image scanned at 8×10 inches will have more pixels than a 100dpi image scanned at 4×5 inches. The higher the resolution, the more detail can be captured from your old prints or slides.

The higher resolution you are able to scan with when restoring your photo negatives and transparencies, the better results you will get when editing them digitally (in Photoshop or another image editor). however there is a limit on how much information a printed photo, slide or negative can provide.

The digital tools available today allow us to make incredible changes in our images without having much concern about loss of detail due to low resolution scanning. However if you want exceptional quality results then invest in high resolution scans, at Yesterdays Photo we can help!

DO YOU NEED AN EXPENSIVE SCANNER?

graphic vintage item

Scanning a photo is something plenty of people are familiar with these days, and truth is for general photo restoration purposes most of the flatbed scanners you can find commercially can do an acceptable job. 

Indeed technology can make a difference when scanning a photo or a negative, but as long as you use best practices and some common sense, your home scanner can become a powerful tool to convert your photos to a digital format without spending thousands of dollars. 

We have indetified and listed a few tips that will help you getting the most out of this process and the best value out of your home scanner.


HERE IS A COMPILATION OF USEFUL
SCANNING TIPS JUST FOR YOU

1. CLEAN YOUR SCANNER SURFACES

This has plenty of common sense, but you will be surprised how often something this simple is overlooked, 

It is important to understand that when scanning a photo in high resolution, we will magnifying artifacts, fingerprints and particles laying on your scanner glass, therefore maintaining your scanner clean, can make a difference and contribute positively on the final quality of your digital capture and can minimise future dust and scratches on originals.

Preparation is a critical step to achieve a good outcome, so it is always good practice to clean these areas with the manufacturer ‘s recommended tools, chemicals and methods before digitally-capturing any image. (alcohol-based products are not recommended)

The objective of this is to minimise the amount foreign elements to facilitate the photo editing, remember that best results come from a good preparation, common practices are:

  • Remove dust and dirt from your scanner. To do this, use a compressed air duster or soft brush to remove dust from the scanner bed, remember that some particles can be hard and scratch the photo or the glass further.

  • Avoid touching the glass plate of your scanner with fingers, as it may leave oil marks on the glass surface.

Magnifier over fingerprint on scanner glass

2. PREPARE THE ORIGINAL

Ensure that your original is as clean and dust-free as possible before beginning any preparation process of an original. 

Cleaning a photo is risky and can impact negatively, so being meticulous and exceedingly cautious with a family heirloom or historical photograph is not only crucial but logical.

If you want to do it well first process an initial scan this will be kind of you insurance, then use a soft brush or cotton swab dipped in distilled water, but be aware that overusing this method could damage your picture. so Instead of targeting vital areas, test the preparation on a non-vital location such as a corner, and measure the result before continuing

Have in mind Some old photos are likely to be colourised manually and water and friction will remove the pigments or contaminate nearby areas, so the work here is surgical.

We strongly advocate hiring a professional to complete this task; nevertheless, if you insist on doing it yourself, be aware that you do it at your own risk.

hand with gloves holding a swap to prepare photo for scanning

3. HIGH-RESOLUTION IS CRITICAL

The more information we obtain from the original photo the better for the restoration or photo enhancement process;  even if you do not see it directly there is plenty of information in a faded or decouloured photo that can help you, so set up your scanner for the highest-resolution possible regardless if the file size appears to be too large.  

It is important to understand the purpose of the photo and the final destination where is going to be used,  based on this you can decide before engaging works the level of restoration required. 

Print and web drastically differ in resolution requirements, being web specially much more easy to handle, at Yesterdays we can provide you with guidance and professional scanning services with a resolution up to 12800 dpi, large format and negative film scanning.

Resolution comparison of an edited portrait

3. ALWAYS SCAN IN COLOUR

Even when digitalising a photo that its originally in black and white, set your scanner to capture the image in colour, this is particulary useful when editing photos that have been stained or have some colour casting due to the pass of time, UV rays or deterioration of the paper or stock they where printed on.

Photoshop is extremely powerful and can give you control of the different colour channels within a photo, this means that even the slightest colour variations or casts can be manipulated and rectified, by obtaining colour information from the source you will have much more control and fidelity, and can save you or our specialists a ton of time. 


Scan your photos in colour even If they are in grayscale, a can full of coloured pencils suggests this

4. STRAIGHT UP YOUR PHOTOS & POSITION THE ORIGINAL CAREFULLY

The closer you scan your image to a 90-degree angle the better, this will help technically and will ease the restoration workflow for you or our restoration specialists, 

Although straightening images is an easy process in photoshop, there are further benefits by scanning your photos in a 90-degree angle and it is the control of the reflection of light within the texture of the paper or stock the photo has been developed on.  

Make sure the original is flat. If you’re scanning a book, make sure it’s lying flat. If you’re scanning a letter or photograph, hold it up to a light and look for any problems with warped edges.

Don’t let your originals wrinkle or get torn during processing; if possible, avoid running them through an automatic document feeder (ADF) so that there is no risk of physical damage. 


Scan your old photos as straight as possible

5. GOOD INPUT = GOOD OUTPUT

Your scanner, the software you use, and the resolution all have an impact on how well your scanned image turns out. The original is the most crucial component. Don’t expect an image that has been scanned to look nice if it is too dark, fuzzy, missing features, or scratched up. The scanner and software can only do so much to correct for such substandard photographs.

Automatic adjustments may produce aberrations and anomalies that aren’t visible when viewing the original. This specifically occurs when scanning colour images captured with budget or film cameras lacking automated exposure control tools.

For a professional scanning service do not hesitate to contact us, we are alway happy to help!

magnifier focusing on yellow surface

6. SCANNING NEGATIVES AND TRANSPARENCIES

There are some things you can do to enhance the quality of your scans, despite the fact that scanning negatives and transparencies might be more challenging:

As was previously mentioned, planning is essential. Prepare the areas in a dust-free environment by using a sensitive microfiber towel or air duster to gently clean both sides of the scanner glass.

Make sure your slides or negatives don’t have any moisture on them.

Before putting them on the scanner area, wipe off any remaining moisture with a fresh, clean cloth. Some scanners will provide you transparency guides to place these and keep them stable.

Bunch of 35mm photo slides

7. USING A DRUM SCANNER

High-End Drum scanning is an expensive and time-consuming process that we only advise when the value of the photograph is sufficient, (not necessarily commercial value). A drum scanner is an exceptionally high resolution device that has a rotating drum in its interior and functions to obtain detailed and sharp reproduction of transparencies and photographs.

So if you are serious about digitising your photograph or transparencies this is one of the preferred options of many photographers and conservationists around the world.

High end drum scannner

8. PRO-TIP!

A professional tip is to scan your photo 4 times, by rotating the photography to 90, 180, 270, and 360 degreee and scanning it using the same scanner setup, you will achieve an extra set of detail, this is particulary helpful to remove or minimise the textures inherited from the original paper or stock as it reduces considerably the glare caused by the reflection of the scanner light when bouncing on the paper texture.

Once scanned you can use photoshop to align the layers and get the most of the photo using different blending modes to add up or subtract pixels and color information.

Note: be aware that when dealing with some type of textures a different technique of post-processing named FFT (Fast-fourier transform) can help you achieving amazing results in record time.


Old photo with a repetitive texture pattern, usually called honeycomb due to its hexagonal-shaped appearance, comparison with a restored photo where this texture has been suppressed