Planning your photograph restoration
Damage Analysis for Effective Photo Rehabilitation

ASSESSING THE DAMAGE OF YOUR OLD PHOTOS
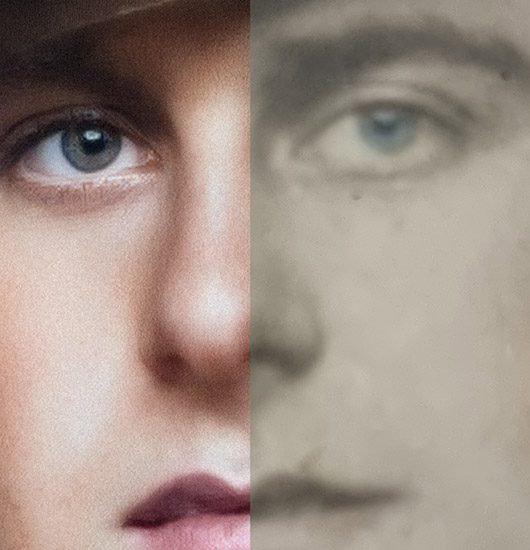
Vintage photographs frequently exhibit not just fading, but also the presence of blemishes, delicate fractures, voids, and a variety of impairments that can span from minor to significant. The process of rejuvenating these images encompasses a meticulous evaluation of the deterioration, followed by the formulation of a comprehensive restoration strategy. This meticulous approach is aimed at remedying the impairments that mar your invaluable reminiscences, ultimately ensuring their revival to their former glory.
At yesterdays we map-out a restoration strategy before engaging works to understand the degree of the damage across and if the damage affects vital areas of the photo such as a face or eyes in a headshot, or dominant elements in the photo composition.
This means that there are photos easier to restore than others, therefore by evaluating the damage of your photo we can categorise the restoration as:
- Minor damage
- Standard damage
- Substantial damage
- Severe damage
UNDERSTANDING THE DAMAGE OF YOUR PHOTO
The most common damages in old photos
Photographs serve as cherished vessels of our life’s most treasured moments. For those fortunate enough to inherit vintage family photos or other invaluable personal artifacts, the journey to safeguard their legacy takes center stage. In a world where the art of preservation is often overlooked, this guide aims to illuminate the path to sustaining these precious heirlooms.
Capturing the essence of time, these photographs encapsulate laughter, milestones, and irreplaceable connections. Yet, the passage of time can cast a shadow, leading to the gradual erosion of these captured memories. Whether through exposure to environmental elements, improper handling, or storage negligence, the potential for damage looms.
This article delves into the nuances of photo damage, unraveling the common culprits that threaten to fade, degrade, or distort these visual treasures. By understanding the intricate web of potential harm, you can empower yourself with the knowledge needed to shield your photographs from the passage of time.
From the subtle embrace of sunlight to the subtler threats of humidity and temperature fluctuations, photographs are engaged in a constant battle for preservation. Delicate as they are, these prints can suffer from fading, discoloration, and physical deterioration if not shielded from harm’s way.
Moreover, the absence of a proper storage and protection plan further exposes these artifacts to jeopardy. Unintentional mishandling, inadequate framing, and improper storage conditions can expedite the wear and tear that comes with the passing years.
Fear not, however, as a treasure trove of wisdom awaits within this article. Gain insights into the vital measures that can be taken to ensure the perpetual vibrancy of your photographic keepsakes. Learn about archival-grade storage solutions, handling techniques, and environmental control methods that form the armor against the relentless march of time.
By arming yourself with knowledge, you stand as a guardian of memories, preserving the emotional tapestry woven within each photograph for the generations to come. Embark on this journey to comprehend, prevent, and combat the forces that seek to undermine your cherished memories. Your photographs deserve nothing less than an eternity of admiration, and with the guidance provided here, you can elevate yourself from a mere spectator of time to its empowered custodian.
Physical Damage

Dust & Scratches
Light scratches and dust

Spider Cracked
Several cracks with a spider-web pattern

Holes & Punctures
Photos damaged by pins or stapplers

Fire damaged
Heavily damaged photos
Water damaged
liquid or water-stained photo

Torn apart
Photos with missing pieces
STAINING, FADING & COLOUR SHIFTING

Faded Photos
Photos faded and clarity loss

Stained Photos
Colour marks on photos

Color casts & Shadows
Parasite lightning and textures
Damage by Dust and Scratches on photographs
Unavoidably, dust will stick to your photograph surfaces at any point exposed to the environment. Dust particles on a photograph are likely to scratch the photo when friction is applied when holding, passing or when cleaning. Naturally occurring dust can also cause damage if it contains sand grains which are abrasive and can scratch photographs in ways similar to those caused by human handling.
Dust and scratches are probably the most common damage found on an old photograph after digitising it as this process exposes them further than before. This damage becomes more evident when digitising as you are magnifying every little scratch making it appear larger than it really is!
Storing your photographs properly can help prevent them from getting scratched. Minimising the manipulation of your photographs also helps keeping them safe. If you have a photograph that needs some help, our photo restoration specialist can remove the dust and scratches digitally and heal your photograph with an extremely detailed technique making these as good as new.
If your old photograph has dirt, sand, or residue on it, you may be able to clean the image by hand. Wear soft gloves, and gently remove the dirt with a soft brush or soft-bristled toothbrush. If there is a large amount of dirt, the photograph may be gently rinsed under warm running water (depending on the paper) . Use your finger to softly wipe away dirt, but take care not scratch the photo. Let the photograph dry in a dark place.
FADED PHOTOGRAPHS
Faded photographs are among the most common damages to collectible photographs. Fading occurs when a photograph is exposed to sunlight or stored in a place that is too hot or too cold.
The most common types of fading are:
Color fading- this type of damage occurs when the image becomes lighter in tone, with less contrast and colour contrast. It may also be accompanied by tonal irregularities (e.g., blotches) which can be seen especially on dark areas within the image area
Texture loss- this type of damage causes areas of fine detail to become blurred and smooth out, resulting in significant loss of information or distortion due to over-aggressive restoration techniques
Dimensional changes- dimensional changes result from either poor storage conditions or improper handling and handling after being removed from its original mount (frame).
What can be done? We offer a restoration service for faded photographs. Our experienced experts will carefully evaluate the condition of your photograph and recommend the most appropriate treatment. We can restore faded photographs achieving uniform colours, boosting colours and bringing back to life the original image.
Even if your photograph has become so light that it is almost impossible to see anything, it may still be possible to recover some visual information with our proper scanners. This means that a faded photograph can be restored to achieve uniform colour
Water damaged photographs
Water damage is one of the most difficult type of damage to restore in photographs. Water can cause a lot of problems to your photograph and it is important that you understand what happens when you get water on your images, so that you know how best to restore them if they are damaged by water.
Water can cause the emulsion to separate from the glass or plastic base it sits on which results in a white haze appearing over part of the image. This can result in staining and fading as well as discolouration and distortion. If it gets very wet then it may even start mould growing on it which will also lead to further damage to your pictures if left untreated for long enough!
If wet photographs are dried out but not treated properly before attempting any photo manipulation, they will never restore their original quality but will remain damaged forever with no hope of ever being fixed again unless brought back into expert hands like ours.
Damage by Dust and Scratches on photographs
Unavoidably, dust will stick to your photograph surfaces at any point exposed to the environment. Dust particles on a photograph are likely to scratch the photo when friction is applied when holding, passing or when cleaning. Naturally occurring dust can also cause damage if it contains sand grains which are abrasive and can scratch photographs in ways similar to those caused by human handling.
Dust and scratches are probably the most common damage found on an old photograph after digitising it as this process exposes them further than before. This damage becomes more evident when digitising as you are magnifying every little scratch making it appear larger than it really is!
Storing your photographs properly can help prevent them from getting scratched. Minimising the manipulation of your photographs also helps keeping them safe. If you have a photograph that needs some help, our photo restoration specialist can remove the dust and scratches digitally and heal your photograph with an extremely detailed technique making these as good as new.
If your old photograph has dirt, sand, or residue on it, you may be able to clean the image by hand. Wear soft gloves, and gently remove the dirt with a soft brush or soft-bristled toothbrush. If there is a large amount of dirt, the photograph may be gently rinsed under warm running water (depending on the paper) . Use your finger to softly wipe away dirt, but take care not scratch the photo. Let the photograph dry in a dark place.
Fire damaged photographs
For most people, the thought of their treasured family photographs being damaged or destroyed is unimaginable. Unfortunately, fires happen and photographs can be affected by soot from smoke or even candles. Fires can also cause water damage coming from pipes or firefighters efforts under a conflagration, which can affect paper photographs as well as photographic prints.
The good news is that we have restored many fire damaged photographs over the years and will do our best to restore yours too!
The first step in any restoration project is to carefully examine the damage to determine whether it can be restored digitally or not . If there are only small areas affected by fire damage then we may be able to repair them digitally; however if they are badly burned in places an expert may recommend removing them completely before restoring them It’s important that you understand there are no guarantees when working with an old photograph damaged by fire, specially if vital areas are affected, however rest assured that every effort will be made to return these irreplaceable memories back into your possession in a condition as close to their original state as possible
Fire damage is perhaps one of the worst ways for your photos to be damaged. We understand that you may have lost many irreplaceable memories as well as precious heirlooms in this tragic event, which makes it all the more important to try and bring them back into their original condition if possible.
Mould damaged photographs
If a photograph has been exposed to excess moisture, it can become vulnerable to mould growth if not properly stored in a cool, dry place.
Mould can grow on your photographs and cause significant damage which may be impossible for you to repair yourself. The best way to avoid this kind of damage is by storing your photos in an environment that is low in humidity and temperature so they don’t become damp and start growing mould.
We recommend storing them in plastic sleeves or archival boxes with desiccants inside until you are ready to display them.
if you find that there are signs of mould on your photographs it may be possible to remove the mould with a soft cloth and a mild detergent. However, if the mould has damaged the photograph it may be possible to restore it with a professional restoration service.
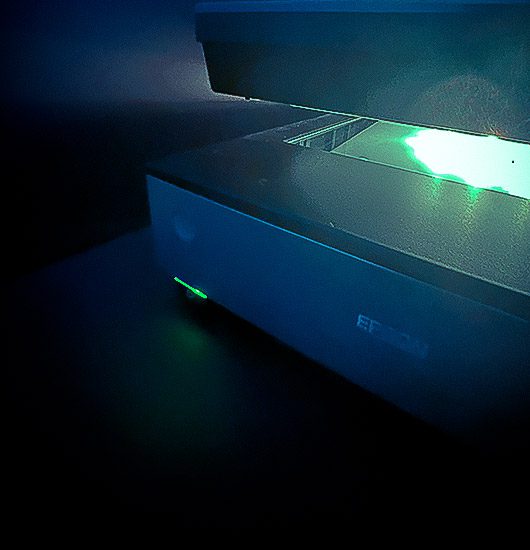
The first step in a professional restoration service will be to assess the damage of the photograph. Next, it is important for you to get a high-resolution scan done so that you can use it to repair any damaged areas.
Photographs can be restored by professionals using a variety of methods. Our professionals will use a scanner or studio to capture a digital image of the photograph and then digitally restore any damage to the photograph digitally with photoshop and other similar software programs including Artificial intelligence (mixed up with what we call artistic intelligence).
The process can take minutes or many hours or days, depending on how extensive restoration is required but it is often more affordable than traditional photograph restoration and results are incredible when printed in our fine art papers, at the end of the day photo restoration is an art.
Learn more about photo restoration cost in our blog
Discoloured or Stained photographs
Discolouration and staining can be caused by many different things including accidental spillages, various pollutants and poor storage conditions.
As well as this, various household chemicals such as cleaning products, cigarette smoke and dust can damage the printed image leaving unsightly marks, smears and faded coloring.
The most common causes of discolouration in photographs are poor storage conditions including exposure to sunlight which fade colours or cause bleaching.
In addition to this poor handling of photos can also cause scratches on them too. These scratches will allow light through causing a white haze over some areas of your photograph that may not have been visible before making it impossible for you to see properly.
To restore faded photographs, we use the latest digital technology to achieve uniform colours and to boost faded areas. Sometimes lost visual information can be recovered by scanning the photograph at a very high resolution or improving the quality of the exposure using photoshop.
Before attempting any photo manipulation, we urge you to consider seeking expert advice from a professional photo conservator as your first choice.
Colour casts and shadows
If you look at a photograph and see that some areas of the image are tinted a certain color, then you are looking at colour cast. A colour cast is caused by the light source used to create the photo (whether natural or artificial). these can be removed by adjusting the white balance in our photo editing software.
It is important to note that all photographs have colour casts – they just aren’t always visible. In other words, if you look at an image and there are no colour.
Ripped or torn apart photographs
Whether someone has deliberately tried to destroy a photograph, or it has torn accidentally, this doesn’t necessarily mean the end.
Rips and tears are one of the most common problems we encounter and often the most satisfying to work on. It’s great to see a torn apart picture come back together again. If you’ve previously used sticky tape to try to fix it, the discoloration this can cause is likely to be rectifiable too.
Unfortunately some parts of an image go missing after a photo is torn. A corner is lost in a house move or, like a sock in the laundry, it simply disappears. We use our artistic skills and historical research to recreate the lost section with amazing results!
Creases and wrinkles
The most common cause of creases and wrinkles are from improper storage. If you want to avoid this problem then make sure your photo is stored in a cool dry place with low humidity so as not to cause condensation on top of the paper surface.
You should also frame your photo with two pieces of glass before putting it into the frame, which will protect against any damage caused by moisture.
Our digital artist will be able to recover your photos from any unwanted or accidental creases, let us help!
Spider-web cracks
The term spiderweb crack refers to the damage caused by a lift of the emulsion off the paper. It usually occurs when there is a violent change in temperature and/or humidity.
While this kind of damage can be repaired by a professional, it is important to recognize that it will not be an easy task. Spider cracks are defined by their shape over the photograph which looks similar to a spider web, with many small lines radiating from one central point on the image.
The severity of these cracks depends on where they appear—if they affect valuable areas such as faces or other focal points in your photograph then you might want to consider professional assistance
If you’re looking to restore your damaged photos, you must be aware of what type of damage has occurred before attempting any repairs.
These cracks can be a challenge for photo restoration professionals since they require special care and attention and techniques in order to be properly repaired.
Tape marks and other adhesives used incorrectly
Tape marks are the result of a poor manipulation of a photograph. The main reason for this is that sticky tape is applied directly to the surface of a photo, causing heavy damage on its way out or leaving a discolouration residue when stuck to the photo.
In some instances it can be physically removed but the photo might be at risk during the process.
In most cases you do not need to remove your own tape from photos as we can digitally restore them for you. Our experts will make sure that your original photograph remains intact and undamaged throughout this process.
When you need to remove tape from your photos, make sure you have a digital copy of the original photograph. Most tape that is applied to photographs will cause some type of damage either on its way out or when stuck to the photo.
Photographs that are stuck together or stuck to Glass
Have you ever discovered a favorite old photograph stuck to the glass of its frame? It’s an upsetting yet common problem for those of us who like to display treasured moments around our home. The sticky part leaves a nasty mark and any attempt to remove it causes rips and tears. good news are It’s possible to restore your picture and have it looking as good as new.
We’re experts at digitally restoring photographs after they get stuck in picture frames — even if the glass is smashed.
First and foremost, DO NOT try to physically remove the photo from the glass yourself. This will most likely cause further damage.
However if you want to try to fix this at your own risk, just do not pull them apart; rather soak them in distilled or ionised water (you can buy this at any drugstore). Before trying to remove the glass, be sure you make a copy of the image just incase it needs more work later on digitally. keep in mind not to leave the photo in water for too long as it might increase the damage.
Photographs are coated with gelatin which softens when exposed to water which makes separating individual prints easier than if they were dry (like after being stored for too long).
You can remove the glass by heating up each corner individually with a hair dryer held 4–5 inches away from backside until loosened up enough where one corner can be lifted up then slowly peeled back by hand or better yet use tweezers!
This tips are meant as guideline only but may fail depending on circumstances & age/condition.
So always seek professional assistance before attempting anything yourself!!
Also keep in mind there’s no guarantee how well these methods might turn out also could end up causing further damage so never put your photos at risk without copying them first.
Peeling photographs
Peeling photographs are a common problem that can occur if your photos are exposed to heat, humidity or moisture or simply time.
The best way to fix this type of damage is to have them professionally restored by a professional photo restoration expert. If you are unable to do this, there is one last option: try using an adhesive to repair the damage.
We come across plenty of low quality photographic paper made for home printers back in the day that peels, so if you have homemade prints make sure you digitise them properly (we can help!)
We hope that we were able to give you some insight into the most common damaged photographs. If you ever come across damaged photographs and are unsure of how to handle them, remember that the best thing to do is call in a professional. They will assess the damage and tell you if there is anything they can do before restoring them so they look like new again! So don’t be shy and get in touch we love to help!
Get in touch
Our Postman will always deliver!
Our team is ready to help – no stamps required!